TL;DR
A low-stop running route planner is the best running route planner for fewer stops with low-stop switched on: click a start, click a finish, read traffic lights, highways, and busy roads on the same map, then move a waypoint until the remaining waits are ones you chose. Open the Run Without Stops map and leave those layers visible while the line draws.
What is a low-stop running route planner?
Low-stop is a routing request, not a second product. Direct mode draws the more literal pedestrian line between your clicks. Low-stop still has to follow legal footpaths and crossings. It prefers streets with fewer signals and tries to keep off highways and busy roads when a quieter alternative exists.
That is how you minimize stops on a run without pretending the city vanished. The watch counts the red. A shortest-path walk still sends you through every signal that sits on the shortest legal geometry. Low-stop adds a cost to those waits so a parallel residential street or a park gate can win.
The marks you see are OpenStreetMap objects for the streets on screen. A traffic-light mark is highway=traffic_signals in OSM (OSM wiki, traffic signals). It is not a live countdown. Use the layer as density: a cluster along a corridor is a reason to pull the line one block over, even if that block is slightly longer.
Continuous running path planning on this map means you treat waiting as part of the distance, then edit the line until the remaining waits are acceptable. It does not mean a zero-stop guarantee. Some park loops get near that. A commute across an inner suburb rarely does.
Why low-stop changes the session
An 8 km line with six lights is a different run from 8 km along a park edge. You start, you stop, you start again. Pace becomes a story after you subtract the waits, which you never actually subtract.
Busy roads add a second cost even when the light is green: a pinched footpath, buses, a corner you take wide. Highways are the next step up. The legal pedestrian option may be a shoulder, an overpass, or a long fence the shortest-path engine still likes because the geometry is clean.
Hill avoidance is a separate switch. Use it with Low stops when the profile matters. A flat highway shoulder is still a bad run. The useful default in most inner suburbs is Low stops on, Avoid hills on if you care about climbing, and lights plus busy roads visible. Direct does not show Avoid hills. The comparison is in flat running routes vs Direct.
For how those marks differ (signal vs crossing vs arterial), stay on the traffic lights and crossings note. This page is the click sequence.
How to build a low-stop line
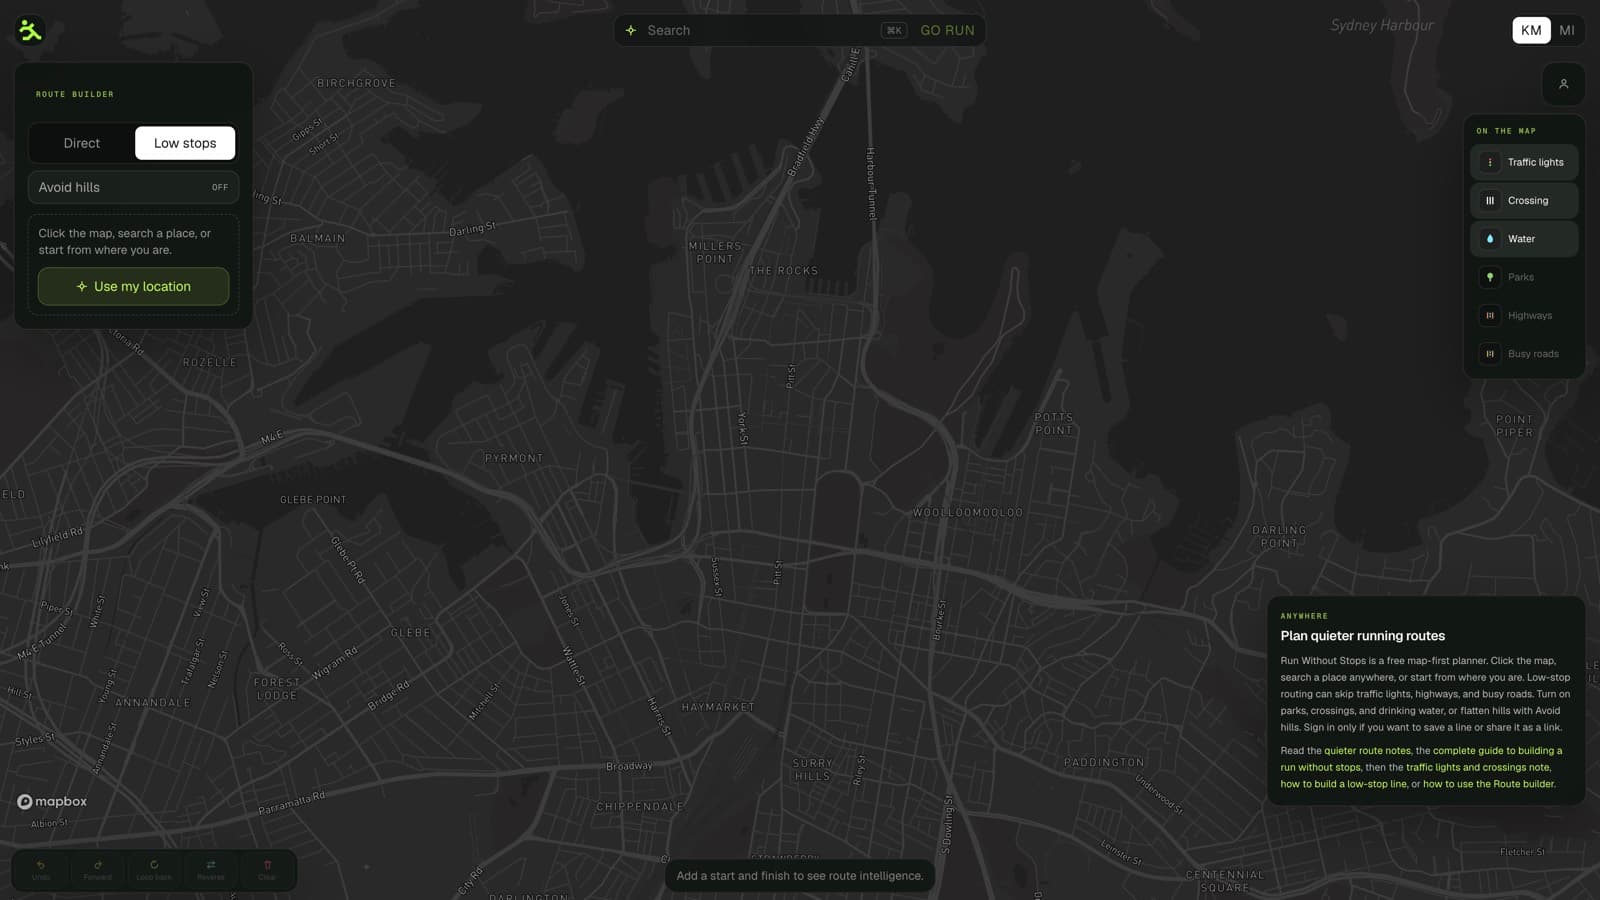
- Open the map. Search a city, zoom until streets appear, or start from where you are. Layers and routing load for the viewport, not for a whole country.
- Set a start. Click the map, pick a search result, or use current location. The camera still opens on Sydney if the browser has no location yet.
- Add a finish. One extra click is enough for a point-to-point. Add more clicks if you already know a park gate, a fountain, or a street you trust.
- Choose low-stop. Leave direct for a loop you already run and do not want rerouted through extra parks.
- If the session should stay flatter, turn on Avoid hills before the line comes back.
- Turn on traffic lights, highways, and busy roads. Parks, crossings, and drinking water help once the bones of the line look right.
- Count remaining light marks on the path. If you can move one waypoint and drop two lights, do that. If the remaining mark is the only way across a six-lane road, keep it.
- Close a loop only when you actually want to finish where you started. Closing on the same arterial you arrived on doubles the signals.
- Export GPX or an image with no account. Sign in only to save a named line or share a
/r/link. Those share URLs stay out of search.
That loop is the whole planner. The intelligence is the layers plus the router, not a hidden score.
Continuous running path planning after the first draft
The first low-stop line is a proposal. Read it against the marks.
If three lights sit in a kilometre, you are looking at a neighbourhood built as a grid of signals, or at two clicks that skipped the park you meant to use. Drop a waypoint on the gate or on the street behind the arterial. Generate again. Centennial Park and a coastal path will forgive a lazy first draft. A Parramatta Road parallel will not.
If the line hugs a highway because the fence is short, that is the geometry winning. Put a point on the residential parallel you can actually run. Low-stop prefers quieter streets. It cannot invent a gap in a motorway.
If a remaining crossing is a zebra on a quiet street, that wait may be acceptable. If it is a signalised crossing on a six-lane road, decide whether you will stand there. The traffic-lights note is the place to sort mark types. This page is the edit: move the point, or keep the crossing.
Mix modes on one saved route when the session has two jobs. Example: low-stop from home to a park entry, direct around the loop you always run, low-stop home on a different street so you do not repeat the same lights. Save it under a name you will recognise at 6 a.m.
Search is worldwide. Type a park, a suburb, a city. Results bias toward the map you are looking at. If nothing comes back, try a more specific name, then zoom to streets before you trust overlays.
What sits on the map while you edit
You are looking at one canvas. Low-stop is a switch on that canvas, not a separate app.
- Traffic lights show where you will wait if the line stays on that street.
- Crossings show where pedestrians are meant to get over the road. Some are signals. Some are zebras or refuges.
- Highways and busy roads are the corridors you usually want the line to refuse.
- Parks are how you skip a block of signals if the gate is in the right place. Put a waypoint on the gate if you care which one.
- Drinking water is a planning object on a warm morning. A fountain on the line is a reason to keep a click.
All of that is OSM for the area you are looking at. If a light is missing, OSM may be missing it. If a park path is missing, the router cannot use it. Treat the layers as the current map, then adjust a waypoint when the street in front of you disagrees.
Export is GPX or an image. Save and share wait until you sign in. Shared /r/ links stay out of the sitemap on purpose.
Common mistakes
- Leaving low-stop off because the direct line looks tidier. Direct looks tidy because it ignored the lights. You meet them later.
- Hiding the traffic-light layer after the line appears. The line is a proposal. The marks are the evidence.
- Two clicks 12 km apart with no park or grid waypoint. The router picks a legal path. It may not pick your park.
- Closing the loop on the arrival arterial. You just ran the same lights twice.
- Using Avoid hills as the only switch. Flat plus a highway is still a chopped run.
- Expecting lights for a whole country. Zoom to the streets you will run.
- Treating a missing OSM mark as a missing pole. If you can see the signal, count the wait even when the layer is late.
FAQs
What does a low-stop running route planner actually change?
It asks the router for a pedestrian line that can skip traffic lights, highways, and busy roads when a quieter legal alternative exists. You still read the layer marks. A remaining wait on the line is a real wait.
How do I minimize stops on a run in Run Without Stops?
Drop a start and finish on the map, choose low-stop, turn on traffic lights, highways, and busy roads, then slide a waypoint off any remaining mark you refuse to wait at. Repeat until the streets match what you will run.
Is low-stop the same as a continuous running path with zero lights?
No. Continuous running path planning here means fewer waits. Park loops and some coastal paths get close. A suburb-to-suburb line usually keeps one or two crossings you cannot skip. Count remaining marks instead of hunting for a fantasy gate.
Should I use low-stop for every segment?
Use low-stop for streets you do not already know. Use direct for a park loop or a gate you always take. Mix both on one saved route when the session has both jobs.
Why did the first low-stop line still hit three lights?
The grid may be built that way, or the two clicks skipped a park or parallel street. Add a waypoint behind the arterial and route again. Then read the complete guide if you also need hills, water, save, and share.
Open the map, drop two points in a neighbourhood you actually run, choose low-stop, and leave the traffic-light layer on while the line draws. If it still looks like a bus route, move a point. If the streets are already yours and you want Direct instead, use how to use the Route builder.